How to Drive a 7-Segment LED
download all demo files: Led7s4d.7z
1 Use of Peripheral Components
This chapter discusses the use of display devices such as LCD display and numeric display (7-segment display) using digital I/O along with STM32DISCOVERY and Waijung blockset
1.1 Introduction to 7-Segment Display
7-segment display consists of 7 LEDs which are arranged in trapezoidal or hexagonal shape as shown figure below. 7-segment comes in many colors and sizes in the market including one digit number, two digit number and four digital number which are widely used. Display information such as temperature, pressure, clock time can be seen easily with the help of 7 segment display.
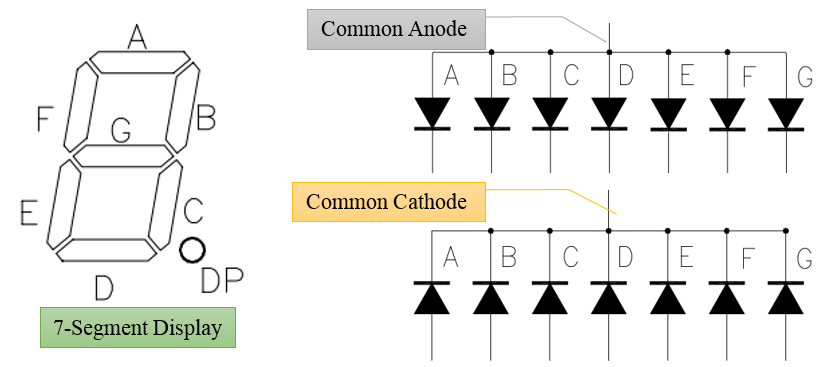
Figure 1‑1: 7-segment display with common cathode and common anode
7-sergment display can be categorized into two types i.e. common anode and common cathode. Decoding for 7-segment display is shown in Table 1‑1 for common cathode. Supply voltage is set to be logic HIGH to turn ON the LED.
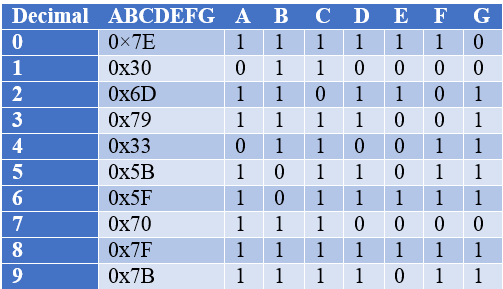
Table 1‑1: Decoding of 7-segment display for common cathode configuration
It is left as an exercise for the reader to make a decoding table for 7-segment display if the configuration is common anode.
2 Experiments for 7-segment Display
2.1 Equipment Used in this Experiment
Figure 2‑1 shows two aMG LEDs4d board which includes a 4 digit numeric display and 7 segment display which has a common cathode configuration (LTC-4727 JS series of LITE-ON. Figure 2‑2 shows the use of aMG LED7s4d with STM32F4DISCOVERY.
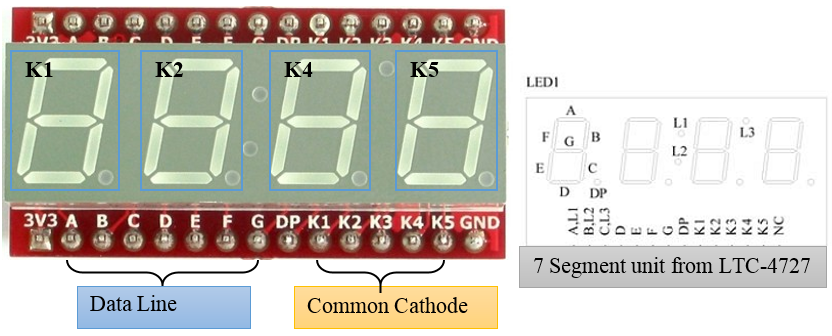
Figure 2‑1: aMG LEDs4d board [1] and pin positioning [2]
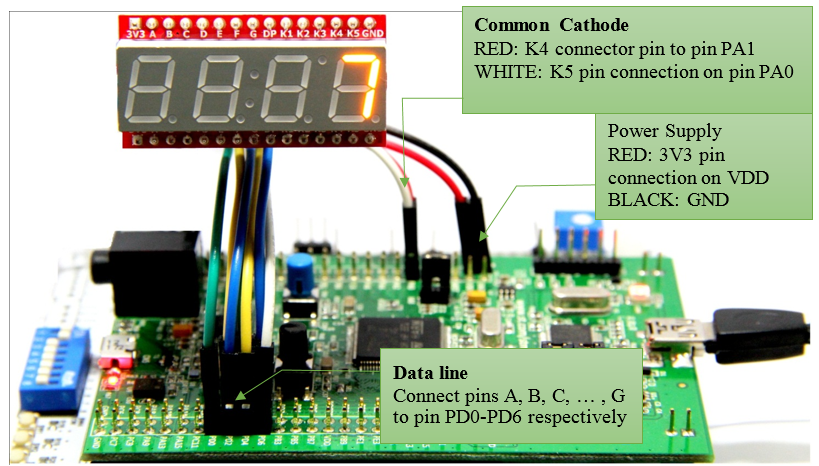
Figure 2‑2: 7-segment display using STM32F4DISCOVERY
2.2 Experiment with 7-segment Display Utilizing One Digit
Purpose
- To provide an opportunity for the reader to learn the structure of 7-segment display device;
- To enable users to create and display the 7-segment subsystem block. How to create subsystem block in Simulink for the display digits in 7-segment is shown in Figure 2‑3.
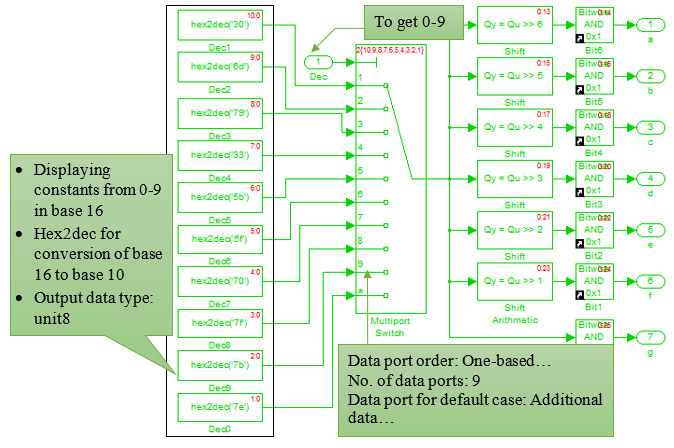
Figure 2‑3: Subsystem block for 7-segment display
The subsystem consists of multiport switch for selecting values in order to turn of the LEDs on the 7-segment as per Table 1‑1. For example, when input port is set to 3, multiport switch will send the value 0x79 or 1111001 to the output port. Default values for the LEDs is set to be 0x7E and there are 10 multiport switches available.
After creating a Simulink model for the 7-segment, numbers are shown from 0 to 9 (up-counting) with each second incrementing the counter. For accessing the Counter Block, user need to go to Simulink >> Waijung Blockset>> Misc. Use the number to display on 7-segment. The counting will keep on repeating.
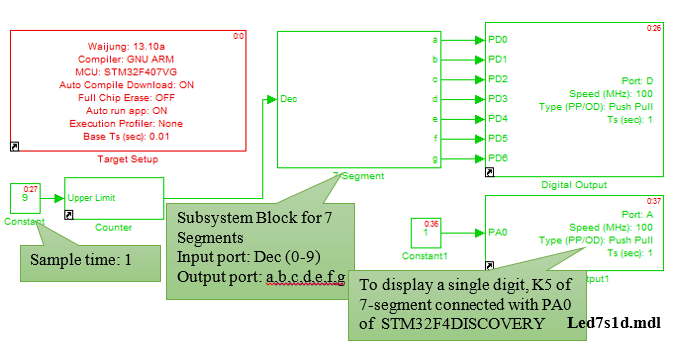
Figure 2‑4: Simulink model for the experiment of single digit 7-segment
It is left on the user to find the answer if someone wish to do down-counting i.e. 9, 8, 7,…, 0 instead of up-counting.
2.3 Experiment – 7-segment Display with Two Digits
Purpose
- Enable users to understand the principles of two digits 7-segment display device;
- To understand the functionality of multiplexer in order to control the LEDs. The details are shown in Figure 2‑6.
Download the program as shown in Figure 2‑5 in STM32F4DISCOVERY. The program will count from 00 to 99 and counter will increment after every 1 second. Simulink model divides this task in two parts. In part A, the numbers from 0 to 99, the value of Counter Block is split. For example, 15 = 1×10 + 5. So index 0 of multiport switch is 5 and the first index is 1.
In part B, its function is to select the data to the subsystem block and the active common cathode by using counter limited block (upper limited: 1, sample time: 0.005) as a reference. If the value of the counter limited block is equal to 0, the subsystem block will display 5 and then the port K5 of a 7-segment will be activated. Therefore, a 7-segment will display 5 at the first digit. On the other hand, if the value of the counter limited block is equal to 1, the subsystem block will display 1 instead and the port K4 of a 7-segment will be activated and it will show 1 at the second digit, as shown in Figure 2‑6. For example, by operating the counter limited block at 200 Hz, the observer will obtain 15 at the 7-segment.
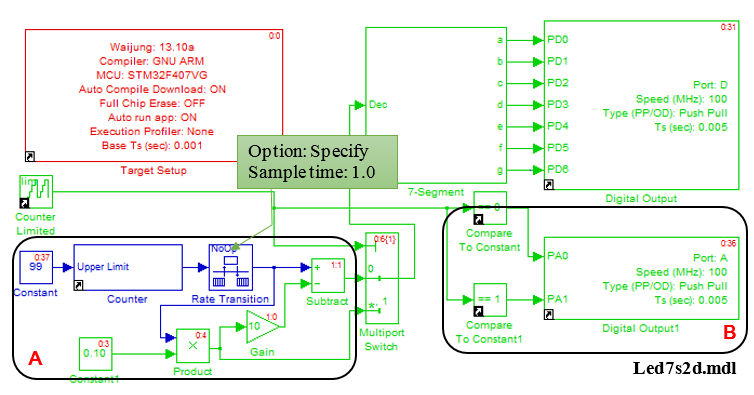
Figure 2‑5: Simulink model for the experiment of two digit 7-segment
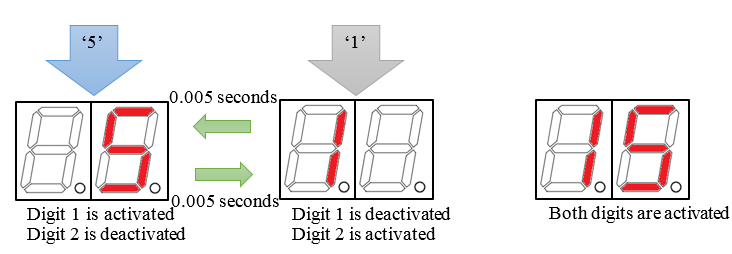
Figure 2‑6: 7-segment representation for double digits
2.4 More Examples
- Enable users to create interesting applications using 7-segment display;
- Enable users to display floating data through 7-segment display.
This experiment is the application of STM32F4DISCOVERY to be used as a digital voltmeter by using an analog-to-digital converter module in order to obtain the voltage from an adjustable resistance and the obtained voltage will be displayed on a 7-segment. Moreover, the user can adjust the decimal position by using a switch. For example, the displayed value of 2.564 V will be displayed as 2.56 and 2.6 by applying the switch button once and twice, respectively.
A Simulink Model, shown in Figure 2‑7, is used for a voltage measurement and its value will be displayed on a 7-segment. It is consisted of many subsystem blocks as shown below.
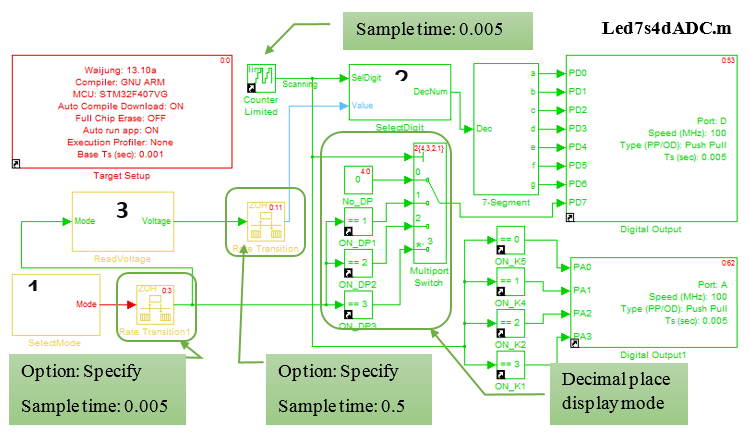
Figure 2‑7: Simulink model for creating digital volt meter
- SelectMode Subsystem Block is a signal from the switch (as shown in Figure 2‑8) Digital Input Block signal to digital pin PB2. SW1 is used to select the mode. The role of each mode is explained as follows.
- Display Mode = 0 with no decimal point. S
- Mode = 1 display with decimal point one position.
- Mode = 2 display with decimal two places.
- Mode = 3 display with decimal point three places
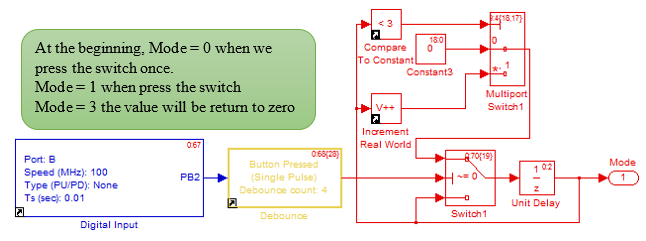
Figure 2‑8: Subsystem model for adjusting the display of decimal places
- SelectDigit Subsystem Block is the factorization of an integer in the range of 0-999. For example 1234 = 1×10³ + 2×10² + 3×101 + 4 as shown in Figure 2‑9
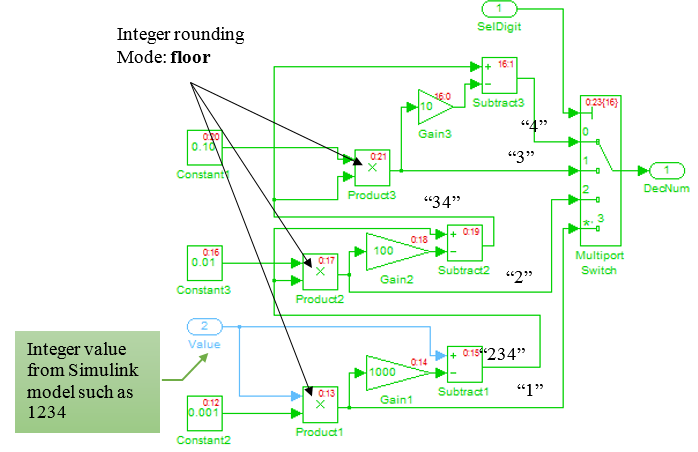
Figure 2‑9: Subsystem block for factorizing integers
- ReadVoltage Subsystem block is the voltage reading outside the Regular ADC Block. It reads the voltage at pin PA5 every 0.01 seconds (Set Sample Time: 0.01). The result is a 12-bit digital data (0 – 4095) to a voltage within the range of 0 – 3.3V.
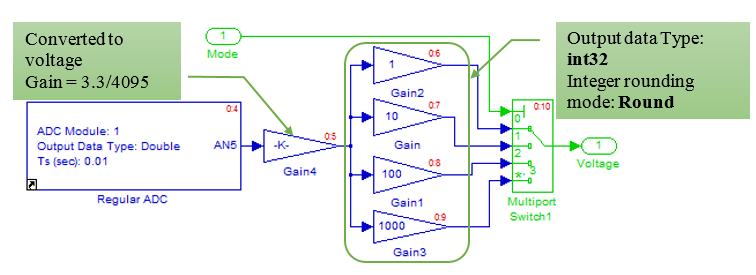
Figure 2‑10: Subsystem model for reading voltage
For a decimal number representation, 7-segment is able to adjust the data into an integer form and then open the LED DP or decimal point in an appropriate position. The value of 1.258 in mode 2 is shown in Figure 2‑11 (two digit decimal 1.258*100 = 125.8) can transform into 126.
For DP, by applying an output at port PD7 and display the decimal digit respected to the mode, the user will obtain 1.26 on a 7-segment.
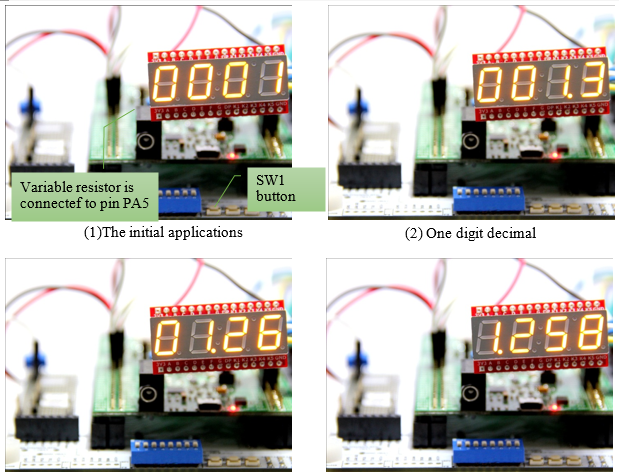
Figure 2‑11: Digital volt meter using STM32F4DISCOVERY
Tips: from the experiment, the value which is lower than 1 (0.75 as an example) will be displayed as 00.75 for the two digit decimal or 000.8 for the case of one digit decimal. What should we do in order to obtain one zero on a 7-segment?
3 References
- Aimagin Co., Ltd. “aMG LED7s4d A Datasheet,” 2011. [Online]. Available: www.aimagin.com/amg-led7s4d.html