Bootloader and IAP protocol with Waijung blockset
Overview
This demo showing an example of implementation the run-time firmware upgrade, mostly used in the product that need features update, bugs fix at end user or located on network. Waijung Blockset provide blocks function to develop this features, demonstration here tested with STM32F4 Target. The demo files are available for commercial and academic licensed users only.
Features
- Operate in normal operation during receive upgrade ROM (new firmware), device required to reboot only when finish receiving ROM data.
- Fail safe upgrade, continue to operation in current running software in case of upgrade fail or error. Boot loader able to retry the upgrade operation when power interrupt during erase or copy sector.
- Firmware validation, reject the corrupted or invalid upgrade ROM.
- Internal flash memory division into 4 sectors: Bootloader, User application, upgrade ROM and user data.
Flash memory organization (STM32F4, 1MB Flash)
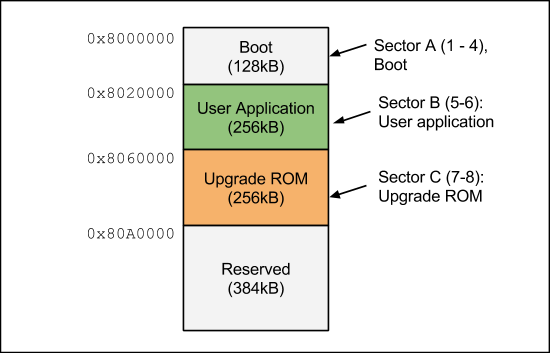
- Boot (128kB), this sector is program once by designer or product manufacture using standard programming tool (eg: ST-Link programmer), and cannot be upgraded during application running. This boot firmware is located on flash sector 1 to 4, total 128kB size (see product sheet of STM32F4 for more details of Flash memory). Optional, Read/ Write protection can be activated to prevent unexpected write or erase to this sector.
- User application, main program sector. It is user application, manage the IAP (in application programming) protocol. Note: IAP can be disabled if this sector did not implementing the communication protocol for receive Boot ROM.
- Upgrade ROM, this is temporary storage area. It store the new upgrade ROM received from IAP communication.
Flash sector memory re-mapping
- Sector B (User application), Flash memory address starting from 0x08020000. This start address will be remap to offset 0x00000000, and end address of Sector is 0x0803FFFF will be remapped to offset 0x0003FFFF.
- Sector C (Upgrade ROM), Flash memory address starting from 0x08060000. This start address will be remap to offset 0x00000000, and end address of Sector is 0x0809FFFF will be remapped to offset 0x0003FFFF.
Communication type
IAP communication is data channel for receiving the new upgrade ROM. Depending on implementation in main program (user application) running, it can be UART, CAN or other.
Entry point and Sector validation (Sector B and C)
Sector B and C can be be validated by CRC32 and firmware signature, by using binary converter software to embedded these value into binary for upgrade ROM

- Entry point, located at start of sector. During MCU startup, entry point is 0x08000000 (Boot sector), boot firmware validate the CRC32 of sector C to perform upgrade if available, then validate sector B (User application) to jump for main program operation.
- CRC32 validation
- During startup, boot loader will calculate CRC32 of sector C and B from offset 0x00000000 to offset 0x0003FFFB. Then compare CRC32 from calculation value to embedded value.
- During normal running, main program (user application) validate the CRC32 of sector C (Upgrade ROM) before reboot to operate in Boot sector.
CRC32 calculation
Polynomial: 0x4C11DB7
Initial value: 0xFFFFFFFF
const unsigned int crc_table[256] = {
0x00000000,0x04C11DB7,0x09823B6E,0x0D4326D9,0x130476DC,0x17C56B6B,0x1A864DB2,0x1E475005,
0x2608EDB8,0x22C9F00F,0x2F8AD6D6,0x2B4BCB61,0x350C9B64,0x31CD86D3,0x3C8EA00A,0x384FBDBD,
0x4C11DB70,0x48D0C6C7,0x4593E01E,0x4152FDA9,0x5F15ADAC,0x5BD4B01B,0x569796C2,0x52568B75,
0x6A1936C8,0x6ED82B7F,0x639B0DA6,0x675A1011,0x791D4014,0x7DDC5DA3,0x709F7B7A,0x745E66CD,
0x9823B6E0,0x9CE2AB57,0x91A18D8E,0x95609039,0x8B27C03C,0x8FE6DD8B,0x82A5FB52,0x8664E6E5,
0xBE2B5B58,0xBAEA46EF,0xB7A96036,0xB3687D81,0xAD2F2D84,0xA9EE3033,0xA4AD16EA,0xA06C0B5D,
0xD4326D90,0xD0F37027,0xDDB056FE,0xD9714B49,0xC7361B4C,0xC3F706FB,0xCEB42022,0xCA753D95,
0xF23A8028,0xF6FB9D9F,0xFBB8BB46,0xFF79A6F1,0xE13EF6F4,0xE5FFEB43,0xE8BCCD9A,0xEC7DD02D,
0x34867077,0x30476DC0,0x3D044B19,0x39C556AE,0x278206AB,0x23431B1C,0x2E003DC5,0x2AC12072,
0x128E9DCF,0x164F8078,0x1B0CA6A1,0x1FCDBB16,0x018AEB13,0x054BF6A4,0x0808D07D,0x0CC9CDCA,
0x7897AB07,0x7C56B6B0,0x71159069,0x75D48DDE,0x6B93DDDB,0x6F52C06C,0x6211E6B5,0x66D0FB02,
0x5E9F46BF,0x5A5E5B08,0x571D7DD1,0x53DC6066,0x4D9B3063,0x495A2DD4,0x44190B0D,0x40D816BA,
0xACA5C697,0xA864DB20,0xA527FDF9,0xA1E6E04E,0xBFA1B04B,0xBB60ADFC,0xB6238B25,0xB2E29692,
0x8AAD2B2F,0x8E6C3698,0x832F1041,0x87EE0DF6,0x99A95DF3,0x9D684044,0x902B669D,0x94EA7B2A,
0xE0B41DE7,0xE4750050,0xE9362689,0xEDF73B3E,0xF3B06B3B,0xF771768C,0xFA325055,0xFEF34DE2,
0xC6BCF05F,0xC27DEDE8,0xCF3ECB31,0xCBFFD686,0xD5B88683,0xD1799B34,0xDC3ABDED,0xD8FBA05A,
0x690CE0EE,0x6DCDFD59,0x608EDB80,0x644FC637,0x7A089632,0x7EC98B85,0x738AAD5C,0x774BB0EB,
0x4F040D56,0x4BC510E1,0x46863638,0x42472B8F,0x5C007B8A,0x58C1663D,0x558240E4,0x51435D53,
0x251D3B9E,0x21DC2629,0x2C9F00F0,0x285E1D47,0x36194D42,0x32D850F5,0x3F9B762C,0x3B5A6B9B,
0x0315D626,0x07D4CB91,0x0A97ED48,0x0E56F0FF,0x1011A0FA,0x14D0BD4D,0x19939B94,0x1D528623,
0xF12F560E,0xF5EE4BB9,0xF8AD6D60,0xFC6C70D7,0xE22B20D2,0xE6EA3D65,0xEBA91BBC,0xEF68060B,
0xD727BBB6,0xD3E6A601,0xDEA580D8,0xDA649D6F,0xC423CD6A,0xC0E2D0DD,0xCDA1F604,0xC960EBB3,
0xBD3E8D7E,0xB9FF90C9,0xB4BCB610,0xB07DABA7,0xAE3AFBA2,0xAAFBE615,0xA7B8C0CC,0xA379DD7B,
0x9B3660C6,0x9FF77D71,0x92B45BA8,0x9675461F,0x8832161A,0x8CF30BAD,0x81B02D74,0x857130C3,
0x5D8A9099,0x594B8D2E,0x5408ABF7,0x50C9B640,0x4E8EE645,0x4A4FFBF2,0x470CDD2B,0x43CDC09C,
0x7B827D21,0x7F436096,0x7200464F,0x76C15BF8,0x68860BFD,0x6C47164A,0x61043093,0x65C52D24,
0x119B4BE9,0x155A565E,0x18197087,0x1CD86D30,0x029F3D35,0x065E2082,0x0B1D065B,0x0FDC1BEC,
0x3793A651,0x3352BBE6,0x3E119D3F,0x3AD08088,0x2497D08D,0x2056CD3A,0x2D15EBE3,0x29D4F654,
0xC5A92679,0xC1683BCE,0xCC2B1D17,0xC8EA00A0,0xD6AD50A5,0xD26C4D12,0xDF2F6BCB,0xDBEE767C,
0xE3A1CBC1,0xE760D676,0xEA23F0AF,0xEEE2ED18,0xF0A5BD1D,0xF464A0AA,0xF9278673,0xFDE69BC4,
0x89B8FD09,0x8D79E0BE,0x803AC667,0x84FBDBD0,0x9ABC8BD5,0x9E7D9662,0x933EB0BB,0x97FFAD0C,
0xAFB010B1,0xAB710D06,0xA6322BDF,0xA2F33668,0xBCB4666D,0xB8757BDA,0xB5365D03,0xB1F740B4
};
unsigned int crc32_update(unsigned int initial, const unsigned int *data, int count)
{
int i;
unsigned int accum = initial;
for (i=0; i<count; i++) {
accum = (accum<< 8)^ crc_table[((accum>> 24)^ (data[i]>> 24))& 0xFF];
accum = (accum<< 8)^ crc_table[((accum>> 24)^ (data[i]>> 16))& 0xFF];
accum = (accum<< 8)^ crc_table[((accum>> 24)^ (data[i]>> 8 ))& 0xFF];
accum = (accum<< 8)^ crc_table[((accum>> 24)^ (data[i]>> 0 ))& 0xFF];
}
return accum;
}
Binary conversion tool
[sta,msg] = amg_iaptool_binconvert('source file','size','output file')
Example, run command at Matlab Command Window:
[sta,msg] = amg_iaptool_binconvert('stm32f4_user_app_stm32f4\stm32f4_user_app.bin','256k','stm32f4_user_app_convert.bin')
Bootloader startup sequence
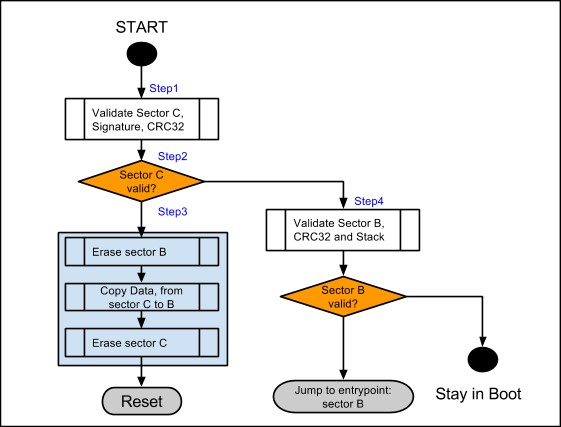
- Step 1: at MCU startup and operate in Boot sector. Boot firmware perform sector CRC32 calculation and Signature (optional) of Sector C.
- Step 2: Firmware upgrade check, by validate sector C. Boot firmware will compare CRC32 of sector C and its embedded CRC32 value. If sector C valid indicates the firmware upgrade required, the next process will be Step 3. If sector C is not valid, then next process will be Step 4.
- Step 3: Firmware upgrade operation.
- Erase sector B (User application).
- Copy entire data of sector C, write into sector B.
- Then erase sector C, so next time startup sector C will be invalid and upgrade is not activated, the process will flow from step 2 to step 4.
- Reset
- Step 4: Main program validation. In this step boot firmware validate sector B, by verify Stack address value, calculate sector CRC32 and compare to its embedded value. If sector B valid, MCU will jump to entry point of sector B.
Fail safe: in case of failure during step 3 (Power interrupt), boot firmware will retry the operation at next start.
Bootloader Demo
Model file
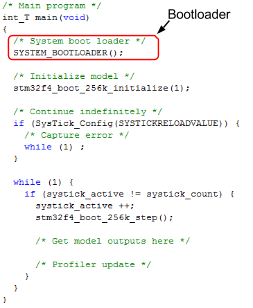
this demonstration imModel file, this demonstration implementing the Bootloader firmware. This model file will be program into sector A (Boot sector).
Demo model file: stm32f4_boot_256k.mdl
Please go to Attachments to download the source files and materials.

When “Boot” block located in the model and after build model, Waijung will generate call to function SYSTEM_BOOTLOADER() at file main.c.
Program Bootloader to device
This firmware will be program once from Auto Compile and Download or manual program via ST-Link tool.
User application and IAP protocol demo
Model file
File: stm32f4_user_app.mdl
Please go to Attachments to download the source files and materials.
This demo model disable auto compile and download.
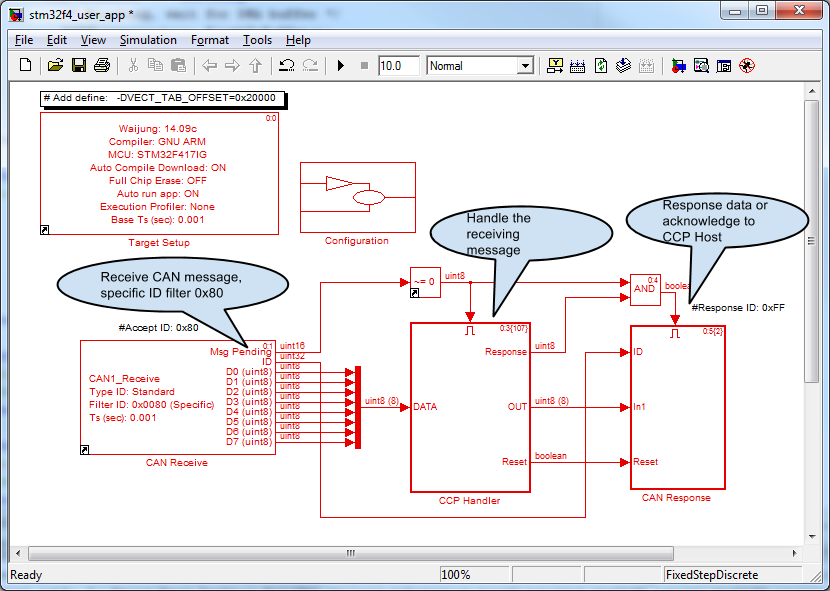
The protocol of communication can be customized, in this demo use CAN Bus (CCP slave) for download ROM to upgrade.
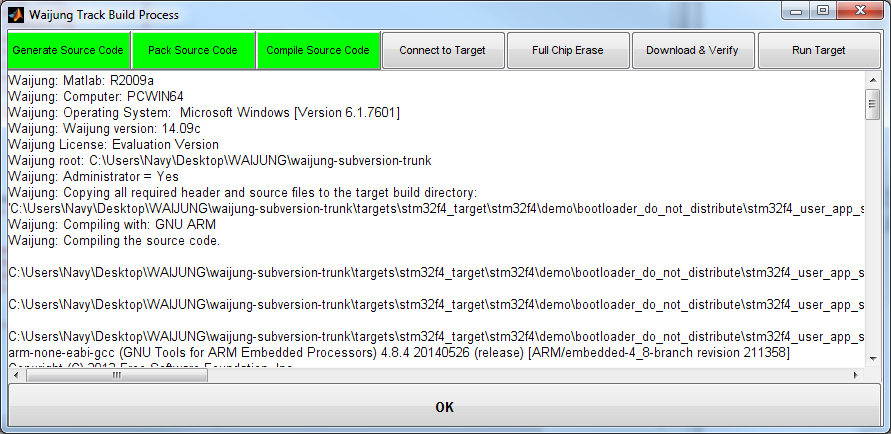
Build and compile model file
This model need only compile, auto download will be disabled. The track build process show as below picture:
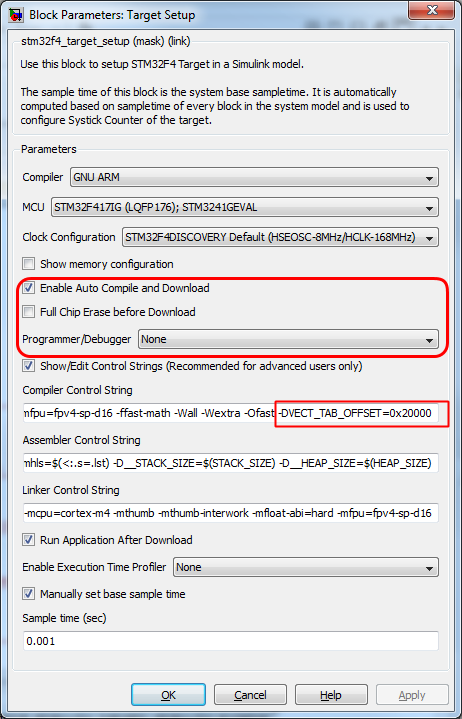
Target Setup
- Add define at Compiler Control string: -DVECT_TAB_OFFSET=0x20000
- Select None for Programmer/ Debugger option.
- Disable (unchecked) option Full Chip Erase
- Enable Auto Compile and Download option (Auto download will not run due to programmer selected as None)
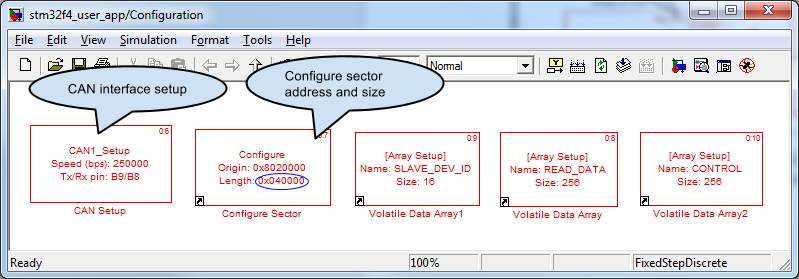
Configuration subsystem
Configure the CAN bus interface and memory used by CCP slave handler.
CCP Handler subsystem
Basic implementation for CCP slave. Only some command support in this demo.
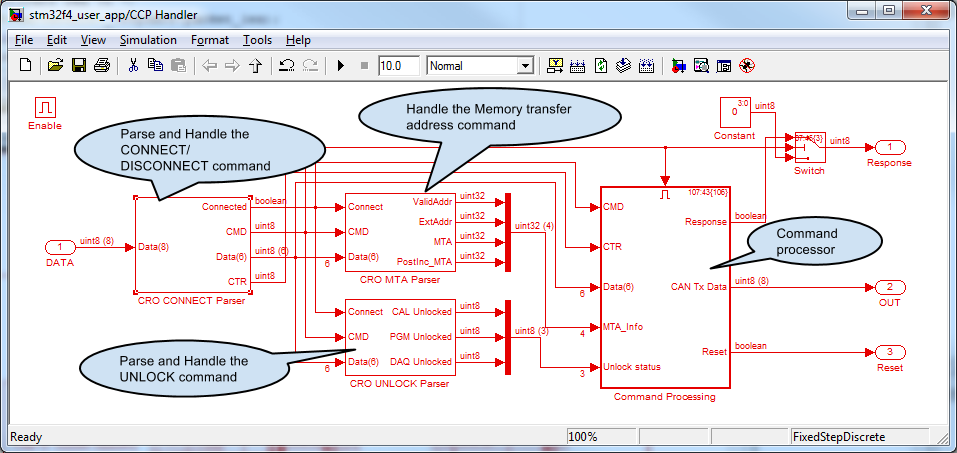
CRO MTA Parser subsystem
Handle the memory transfer address.
- Extension address 0, Device ID. This extension address is for upload the data at memory SLAVE_DEV_ID which defined in block “Volatile Data Array1”. The valid address for this storage is 0 to 0x0F.
- Extension address 1, Read only memory. This extension address is for upload data at memory READ_DATA which defined in block “Volatile Data Array”. This memory can be use to store the measurement data, use block “Volatile Data Array Write” to update this memory.
- Extension address 2, Read and Write memory. This extension address is for upload and download data at memory CONTROL which defined in block “Volatile Data Array2”. This memory can be used for store the control value from Host. Use block “Volatile Data Array Write” to update this memory and use block “Volatile Data Array Read” to read value from this memory.
- Extension address 3, this is Boot ROM memory address. During IAP process, host sending ROM data to store into this memory address.
Command Processing subsystem
This subsystem enabled only after receive CCP connect command. List of command support implemented in this demo:
- CONNECT
- EXCHANGE_ID
- GET_SEED
- UNLOCK
- SET_MTA
- DNLOAD/ DNLOAD_6
- UPLOAD
- SHORT_UP
- DISCONNECT
- BUILD_CHKSUM
- CLEAR_MEMORY
- PROGRAM/ PROGRAM_6
Program the bootloader and user application firmware
- Build and Program boot firmware (via ST-Link)
- Build (Auto compile and Download) model file stm32f4_boot_256k.mdl to the target for one time. The target is now running at boot firmware (without a valid user application).
- Build user application, build model file stm32f4_user_app.mdl, the output binary file will be created in output directory “stm32f4_user_app_stm32f4\stm32f4_user_app.bin”.
- Generate binary file with embedded CRC32 calculation. Run below command at Matlab command window.
- [sta,msg] = amg_iaptool_binconvert('stm32f4_user_app_stm32f4\stm3
2f4_user_app.bin','256k','stm32f4_user_app_convert.bin')
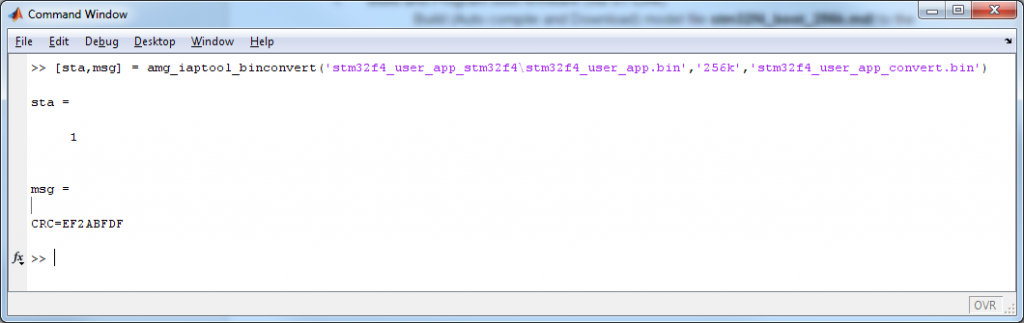
The binary conversion tool will generate output file stm32f4_user_app_convert.bin with embedded CRC32 at the end of memory sector (256kB size).
- Program the User application for first time
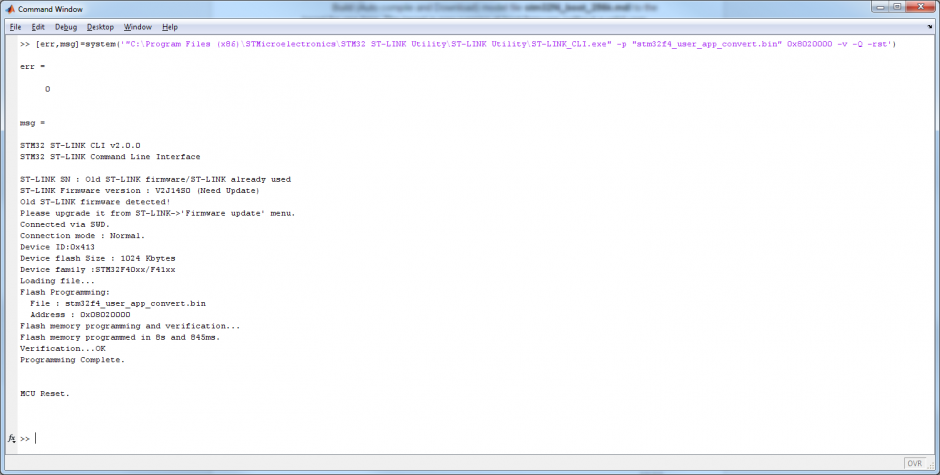
After done programing the boot firmware in step 1, it is no IAP handle running due to no valid user program. To program user application at first time still need ST-Link. use this command line run for program user application for the first time.
- [err,msg]=system('"C:\Program Files (x86)\STMicroelectronics\STM32 ST-LINK Utility\ST-LINK Utility\ST-LINK_CLI.exe" -p "stm32f4_user_app_convert.bin" 0x8020000 -v -Q -rst')
IAP protocol demo
When the target run in User Application (programming done at previous step), then it is now able be handle the IAP protocol.
Overview
To program the Target board via IAP (CAN), Host PC need another STM32F4 or STM32F0 board with CAN interface to convert the UART command to CAN message, and also receive CAN message then convert to UART response back to Host PC. As shown below diagram.
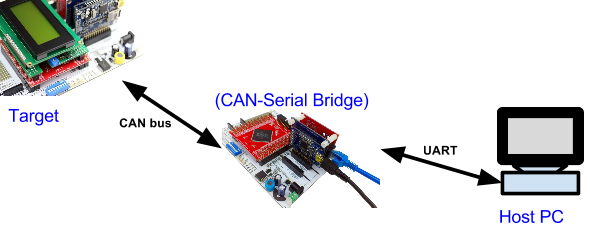
CAN-Serial bridge
Build model file stm32f4_can_serial_bridge_binary.mdl to run as CAN-Serial Bridge device. The protocol is similar to below URL except the target board is STM32F4: http://waijung.aimagin.com/index.htm?can_to_serial_bridge.htm
Note for USB Converter used for USB to serial conversion
If use “aMG_USBConverter-N” or “aMG_USBConnect” for serial conversion, time for IAP may be reduced by set Latency to 1ms. Follow this instruction: http://waijung.aimagin.com/index.htm?latency_time_setting.htm
CAN bus message used in IAP demo
- Step 1: Host send serial command to enable CAN-Serial Bridge to receive ID type standard, and ID filter is 0xFF. See topic Filter setting command: http://waijung.aimagin.com/index.htm?can_to_serial_bridge.htm
- Step 2: Host transmit CAN message (via CAN-Serial bridge), command CONNECT:
Host Tx : [CCP_CONNECT] [CTR] [x] [x] [x] [x] [x] [x]
Slave Tx: [0xFF] [CODE] [CTR] [x] [x] [x] [x] [x]
; Where CODE=0 indicate success.
; CTR is command counter - Step 3: Host transmit, command CCP_GET_SEED for programming.
Host Tx : [CCP_GET_SEED] [CTR] [0x40] [x] [x] [x] [x] [x]
Slave Tx: [0xFF] [CODE] [CTR] [PROTECT] [Key1] [Key2] [Key3] [Key4]
; Where PROTECT is programming protection status.
; Key1, Key2, Key3 and Key4 is seed key use by unlock command. - Step 4: Host transmit, command CCP_UNLOCK for enable programming.
Host Tx : [CCP_UNLOCK] [CTR] [0] [0] [Key1] [Key2] [Key3] [Key4]
Slave Tx: [0xFF] [CODE] [CTR] [Privileged status] [x] [x] [x] [x]
; Where Key1, Key2, Key3 and Key4 is seed key from GET_SEED command. - Step 5: Host transmit, command CCP_SET_MTA to configure address of Upgrade ROM (Extension address = 3), address to configure = 0x00000000.
Host Tx : [CCP_SET_MTA] [CTR] [MTA0] [3] [0] [0] [0] [0]
Slave Tx: [0xFF] [CODE] [CTR] [x] [x] [x] [x] [x]
; Where MTA0 = 0 - Step 6: Host transmit, command CCP_CLEAR_MEMORY to erase flash memory at the current configuration of MTA done by previous step. The memory size to erase is 256kB.
Host Tx : [CCP_CLEAR_MEMORY] [CTR] [0x00] [0x04] [0x00] [0x00] [x] [x]
Slave Tx: [FF] [CODE] [CTR] [x] [x] [x] [x] [x] - Step 7: Host transmit, command CCP_SET_MTA to configure address of Upgrade ROM (Extension address = 3), address to configure = 0x00000000.
Host Tx : [CCP_SET_MTA] [CTR] [MTA0] [3] [0] [0] [0] [0]
Slave Tx: [0xFF] [CODE] [CTR] [x] [x] [x] [x] [x]
; Where MTA0 = 0
; Extension address = 3 for upgrade ROM. - Step 8: Host transmit the boot ROM data, command CCP_PROGRAM and CCP_PROGRAM_6.
CCP_PROGRAM_6:
Host Tx : [CCP_PROGRAM_6] [CTR] [D0] [D1] [D2] [D3] [D4] [D5]
Slave Tx: [0xFF] [CODE] [CTR] [MTA0] [Add3] [Add2] [Add1] [Add0]
; Where Add3, Add2,Add1 and Add0 is post increment address.CCP_PROGRAM:
Host Tx : [CCP_PROGRAM] [CTR] [SIZE] [D0] [D1] [D2] [D3] [D4]
Slave Tx: [0xFF] [CODE] [CTR] [MTA0] [Add3] [Add2] [Add1] [Add0]
; Where SIZE = 1 to 5, number of bytes to program
; Add3, Add2,Add1 and Add0 is post increment address.
Following diagram showing transmit sequence for upgrade ROM data.
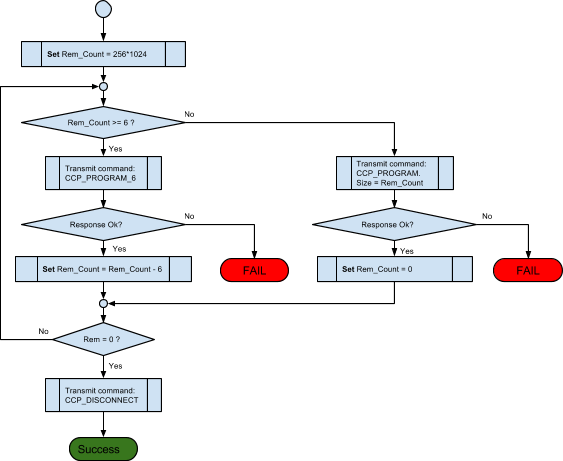
- Step 9: Host transmit, command CCP_DISCONNECT. Target MCU will reset to operate in boot firmware when receive this command from Host.
Host Tx : [CCP_DISCONNECT] [CTR] [x] [x] [x] [x] [x] [x]
Slave Tx: [0xFF] [CODE] [CTR] [x] [x] [x] [x] [x]
IAP testing (Via CAN-Serial Bridge)
Command line:
- [sta,msg] = amg_canserial_bridge(‘<function>’, <canid>,’<filename>’,’<sectorsize>’)
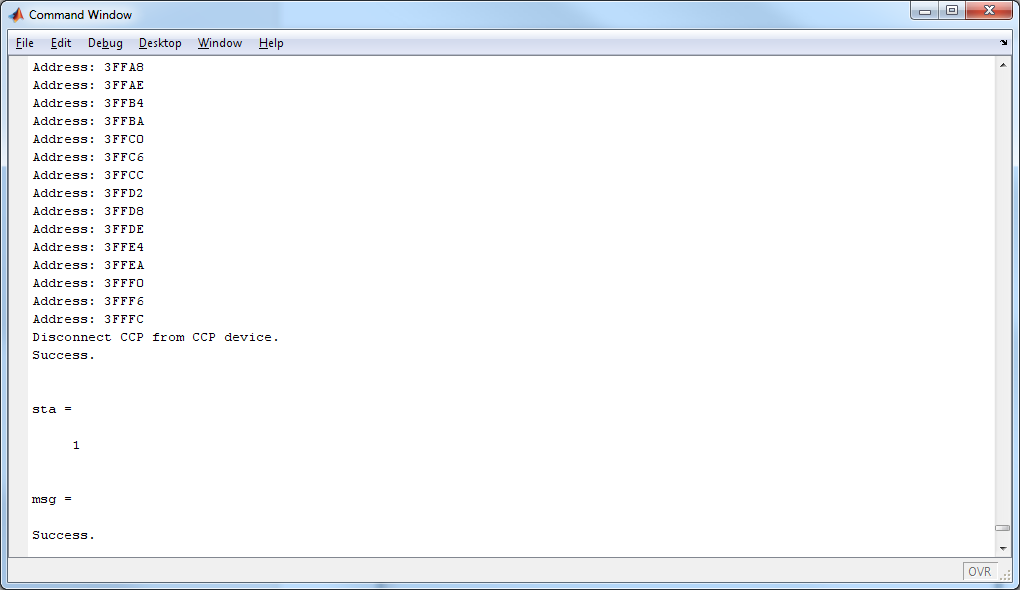
At Matlab command windows, run command as show in below picture.

Wait until IAP process to finish.
Attachments
Model files
All model files and materials: Bootloader and IAP with Waijung Blockset.zip